Want to Fix Slow Page Loading Times & Increase Site Speed ,If yes then you can easily do this using 2 Simple ways that we are going to mention in below steps.
Max Cdn will Increase the number of page views,Higher conversion rate,Happier visitors ,Reduce server stress. Just try above two tip and Reduce Page Loading Time and Increase Load Speed Of WordPress Blog.How to Select all/Invite all Friends in Facebook Fan page or Event at once best and one Working Method - SOftware Bazar

Hi Friends Before some monthe ago it was very easy to select all friends with java Script Code..But Now many kind wo Codes does not work…
So here is Some New Ways.
I searched alot and I got only this one and best way to Select all or invite all friends at once.
This is fireFox Extentions.
Follow the Steps and Learn How you can do this.
- Download Greasemonkey Click Here Fire Fox Extention and install it into your FireFox. and must Restart your browser after installation of this plugin.
- Install Select all plugin click here for select all friends in firefox. if it will not work use this mirror.
- Now here you done installation
- Now Restart your BrowserLogin to Your Facebook Account and go to your Facebook Fan Page or Event and click on Invite all Friends. there you can see select all friends option in your facebook select all box…
- This Content is Legal and Copyright by Software-Bazar
If you Got Any Problem Feel Free to Contact us or Comment here..:)
USe Your COmputer By Your Voice Voice Recongnition Software ► Software Bazar
Voice and Speech Recognition
An easy software solution to enable you to control your computer, dictate emails and letters, and have the computer read documents back to you. 10 Reasons for Trying
e-Speaking's Software
- Free Download of software
- Over 100 commands built-in
- Ability to add more commands
- Runs in Windows2000 and WindowsXP
- Small file size
- Utilizes latest technologies from Microsoft
- Seamlesly integrate with Office
- Voice commands of Mouse events
- Based on SAPI and .NET technologies
- Easy to Use
Now you can tell your computer what you want it to do.
Download From here : http://www.e-speaking.com/
What Is It?
Command and control your Window's computer through your voice. Operate your computer using a minimum of keystrokes or mouse clicks. If you want to move the cursor down one line, simply say: Down One. Want to check your emails? Simply say: Open Email. Add commands to open and control any Window's document or program.What is Speech Recognition? What is Voice Recognition?
These are exciting technologies that change the way you interact with your computer. Now you can speak to your computer and it can speak back. The speech that you and your computer exchange is scripted. In other words, you can't just ask your computer how he/she is feeling? Rather, you can talk to your computer using a set of pre-defined commands and instructions (i.e., a script). Your computer will respond in the same way (also using a scripted language). For example, you can say: "File Open", and the computer would respond: "Select the file". Or you can say: "Edit Find" and the computer would ask: "Find What?".Why speak to your computer?
People have been speaking to each other for tens of thousands of years. Our brains have evolved to perform a fantastic and complex set of analyses of auditory input (i.e., sounds). Our brains convert the sounds we hear into conceptual ideas and thoughts which in turn form the basis of instructions, commands, information, and entertainment. Though the computer is just beginning its evolution in this area, most computers are capable of hearing your speech and acting on it. This is the promise of voice recognition technology today. Using speech to interact with your computer--both you speaking to your computer and your computer speaking back.How Does It Work?
Utilizing Microsoft's Speech Application Program Interface (SAPI) and Microsoft's .NET Framework, we have developed a very small and efficient voice command and recognition application. SAPI and .NET are both required to use this software.Dictation as Well?
Voice Dictation is integrated into the e-Speaking application including 26 different Dictation Voice Commands.Why e-Speaking?
Our intent in developing this product was to suppliment your ability to command and control your computer through your voice. To enable you to have access to dictation software using Microsoft's SAPI speech engine. And to allow the computer to read documents and emails to you.How Expensive is It?
It is Shareware. That means: You can download it and try it out for 30 days to see if you like it. The 30 day trial period is Free! That's right. You can download it with over 100 built-in commands and begin using it today at no cost. If you really like the program and want to use it beyond the first 30 days, the cost is $14.Users Guide?
Access the on-line user's guide.What is Speech Recognition?
Speech Recognition is a technology that allows the computer to identify and understand words spoken by a person using a microphone. The ultimate goal of the technology is to be able to produce a system that can recognize with 100% accuracy all words that are spoken by any person. Even after years of research in this area, the best speech recognition software applications still cannot recognize speech with 100% accuracy. Some applications are able to recognize over 90% of words when spoken under specific constraints regarding content and previous training to recognize the speaker's speech characteristics.
Computer software that understands your speech enables you to have conversations with the computer. These conversations would include you and the computer speaking as commands or in response to events, input, or other feedback.
Speaking is easier and more intuitive than selecting buttons and menu items. Human speech has evolved over many thousands of years to become an efficient method of sharing information and giving instructions.
Useful when accessing systems through pay telephones that do not have attached keyboards.
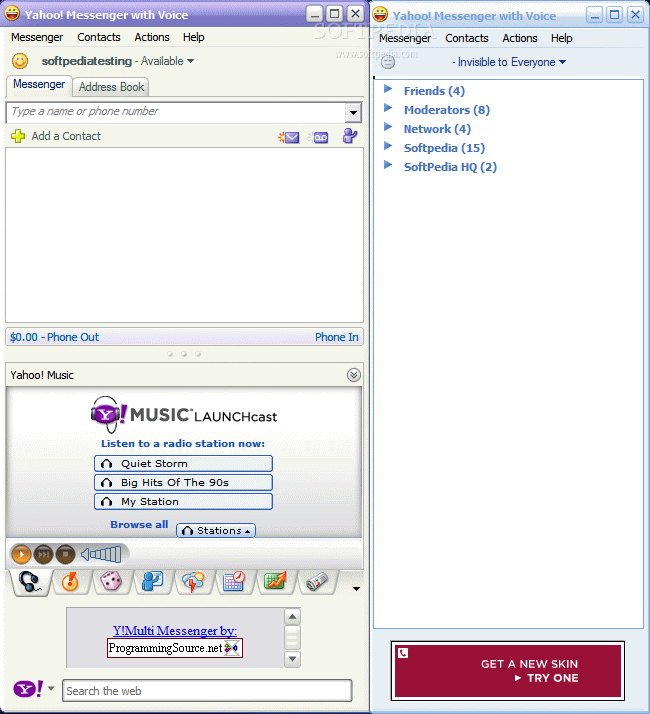
Login with two yahoo ids at same time - Software►Bazar
Just Download below attachment and Install then you will be able to login with multiple yahoo ids at the same time on the same machine..
screenshot-

Y! Multi Messenger description-
A free and useful utility that allows you to run multiple instances of Yahoo! Messenger.
Y! Multi Messenger allows you to run multiple instances of Yahoo! Messenger instead of only keeping one open.
This is perfect for those who run under several names. There are others out like this...but have an "update prompt", this does NOT have that!
screenshot-
Y! Multi Messenger description-
A free and useful utility that allows you to run multiple instances of Yahoo! Messenger.
Y! Multi Messenger allows you to run multiple instances of Yahoo! Messenger instead of only keeping one open.
This is perfect for those who run under several names. There are others out like this...but have an "update prompt", this does NOT have that!
How to Create A CopyRight © Any Where - Trick Bazar

To create the Copyright symbol © on a PC:
-
hold down the Alt key while keying in the numerics 0169
Try it!
On a Mac:
simply enter Option + G
Dont Forgot to Say thanks In Comment :)
©
Stop "Dont send" error message in Windows XP - Software Bazar
Stop "Dont send" error message in Windows XP

I know all of you guys hates that Don't send error message. it appears when windows faced a critical situation or program failure. people call that error message as "Don't send error" because there is to oprions for us and most of times people ignore this alert by clicking on "Don't Send" button. sometimes this message appears just for little reasons and our computer get stucked. thats why people hate this so much. im going to tell you a simple trick to remove this error message warning in Windows xp for forever.
This is a sample of that error message

very annoying picture. isn't it? :P
Now follow these directions to remove this error reporting feature permanently from your computer * Right-click My Computer and choose Properties. or go to control panel and Double click System icon.
* Click the Advanced tab on your System Properties dialog box.
* Now click the Error Reporting button on the Advanced tab.
* Place a checkmark next to “Disable error reporting.” option
* Also Leave the other radio button unchecked next to the text labeled, “But notify me when critical errors occur.”
Now you will never see that error unless you have a serious error that might do a harm to your operating system.
Please leave comments if this post was useful to you
Reset XP and Vista Login Passwords - Software Bazar

Reset XP and Vista Login Passwords
This works 100%. Tested it on DUAL boot (on same hard drive XP & Vista in different partitions and resetted passwords on both the operating systems) as well. Fantastic work in seconds. Even activated the disabled Administrator account on Vista with ease resetted its pass as well. WORKS JUST AWESOME.
INSTRUCTIONS ON HOW TO USE
To boot from CD:
1. Just burn the ISO on a blank / re-writtable cd
2. boot & follow instructions carefully.
To boot using a USB drive / key: (your target system needs to support USB boot)
1. (make sure you have winrar or some tool to extract the ISO files contents) Now right click the ISO and select Extract option. Copy all files which you extracted onto the USB drive in open / root of it. NOT IN ANY FOLDER
2. Run the following from a command prompt ( Start > Run > cmd ) like this:
x:\syslinux.exe -max: where x is your USB drive letter
replace x with some other letter if your USB drive is on another drive letter than x:
If it says nothing, it installed the bootloader correctly.
3. Now make sure you have the USB boot option selected and on top on the target computer
4. insert this USB in to the system and boot
5. boot menu will appear automatically
6. read the instructions carefully and reset the passwords
CLICK HERE >>>>>>>>>>>> Download Instructions
WANT TO SAY THANKS ??? JUST CLICK ON THE BANNER AD SEE BELOW
How to save flash movies from web pages with no software - Software Bazar
Sometimes when you see interesting movie clip or image on website and click with right button of your mouse on them nothing happens. You see only a menu Zoom in or About Adobe Flash Player 9.. This is because flash objects doesn't have a download feature. However there is a free trick to save this movie on your computer. Indeed the truth is that you already have dowloaded it but it is well hidden in your browsers temporary folder. All you have to do is to go to that folder and resave it in your desired place.
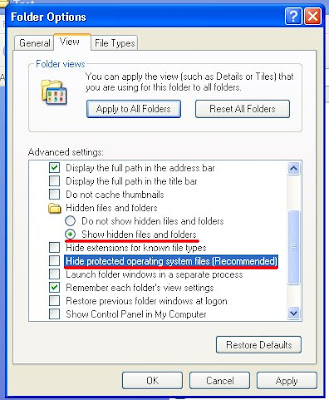
- 1 step is to make sure that you can see hidden folders. To do that open no matter what folder and press Tools -> Folder options:

When folder options panel is open click on View bar and select radio button Show hidden files and folders and unselect Hide protected operating system files (Recommended). Press apply and ok.
- Step 2 Now you have to go to Temporary Internet Files folder and search for that flash movie file. To do that go to My Computer -> C disk -> Documents and Settings folder -> Your User Name (e.g. Bobby) -> Local Settings (this folder is hidden and looks like washed out) -> Temporary Internet Files (also hidden folder)

When you open Temporary Internet Files folder you see a bunch of various files. Try to sort them out by clicking on Type button
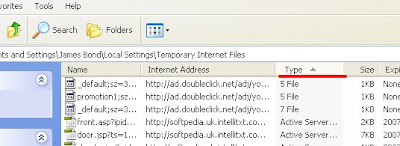
- Step 3 Now you have to find the movie clip you want to save. Scroll down until you see file type ShockwaveFlash Object. Here are a list of all flash files on web pages you have visited.


 You can narrow search process by looking at Internet address column which should match your site url. Then manually check if the flash movie file is correct and when it is just right click on it and select copy anywhere you want
  Notice: in order to play flash movie file locally on your computer you have to install flash player, otherwise windows will not recognize flash file as playable. One way to get rid of this situation is to drag flash movie files on open internet explorer window, then it will play on the entire browser window.
  That's it, now you have flash movie on your computer saved.
Tip!
If your Temporary Internet Files Folder contains too much files try to delete them all and refresh browser where flash clips are. Those files should be downloaded again into TIF folder so you don't miss them.Awesome Fun Note Pad Tips N Tricks On Pc Part 5 (download on rapidshare unlimited) - Software Bazar
Ok......heres the simple tricks, fiirst open notepad on your pc and type this:-
@echo off
echo ipconfig/flushdns
ipconfig/flushdns
echo ipconfig/release
echo ipconfig/flushdns
ipconfig/flushdns
echo ipconfig/release
second, save it as bypassrapid.bat or any name with the extention .bat and save as all file.
third, every time you want to download from rapidshare, just double click the file and you will download there for unlimited.
Dn`t forgot to say THanks !!!!!!!!!!!
Dn`t forgot to say THanks !!!!!!!!!!!
Bit Torrent Tutorial - Software Bazar
The first things you need to know about using Bit Torrent:
-- Bit Torrent is aimed at broadband users (or any connection better than dialup).
-- Sharing is highly appreciated, and sharing is what keeps bit torrent alive.
-- A bit torrent file (*.torrent) contains information about the piece structure of the download (more on this later)
-- The method of downloading is not your conventional type of download. Since downloads do not come in as one big chunk, you are able to download from many people at once, increasing your download speeds. There may be 100 "pieces" to a file, or 20,000+ pieces, all depending on what you're downloading. Pieces are usually small (under 200kb)
-- The speeds are based upon people sharing as they download, and seeders. Seeders are people who constantly share in order to keep torrents alive. Usually seeders are on fast connections (10mb or higher).
In this tutorial, I will be describing it all using a bit torrent client called Azureus. This client is used to decode the .torrent files into a useable format to download from other peers. From here on out, I will refer to Bit Torrent as BT.
Which BT client you use, is purely up to you. I have tried them all, and my personal favorite is Azureus for many reasons. A big problem with most BT clients out there, is that they are extremely CPU intensive, usually using 100% of your cpu power during the whole process. This is the number one reason I use Azureus. Another, is a recently released plug-in that enables you to browse all current files listed on suprnova.org (the #1 source for torrent downloads).
Before you use the plug-in, take a look at /http://www.suprnova.org, and browse the files. Hold your mouse over the links, and you'll notice every file ends in .torrent. This is the BT file extension. Usually, .torrent files are very small, under 200kb. They contain a wealth of information about the file you want to download. A .torrent file can contain just 1 single file, or a a directory full of files and more directories. But regardless, every download is split up into hundreds or thousands of pieces. The pieces make it much easier to download at higher speeds. Back to suprnova.org. Look at the columns:
Added | Name | Filesize | Seeds | DLs (and a few more which aren't very useful.)
I'll break this down.
Added: Self explanitory, its the date the torrent was added.
Name: Also self explanitory.
Filesize: Duh
Seeds: This is how many people are strictly UPLOADING, or sharing. These people are the ones that keep .torrent files alive. By "alive", I mean, if there's no one sharing the .torrent file, no one can download.
DLs: This is how many people currently downloading that particular torrent. They also help keep the torrent alive as they share while they download.
It's always best to download using a torrent that has a decent amount of seeders and downloaders, this way you can be assured there's a good chance your download will finish. The more the better.
Now that you should understand how torrent files work, and how to use them, on to Azureus!
First, get JAVA! You need this to run Azureus, as java is what powers it. Get Java here: /http://java.sun.com/j2se/1.4.2/download.html
Next, get Azureus at: /http://azureus.sourceforge.net
Next, get the Suprnovalister plugin from /http://s93732957.onlinehome.us/storage/suprnovalister.jar
Install Java JRE before you do ANYTHING.
Install Azureus, and then in the installation folder, create 2 more folders. ./Plugins/suprnovalister (For example, if you installed Azureus to C:\PROGRAM FILES\AZUREUS, create C:\PROGRAM FILES\AZUREUS\PLUGINS\SUPRNOVALISTER). Next, put the suprnovalister.jar file that you downloaded, in that folder.
Load up Azureus, and if you want, go through the settings and personalize it.
The tab labeled "My Torrents" is the section of Azureus you need the most often. That lists all your transfers, uploads and downloads. It shows every bit of information you could possibly want to know about torrents you download.
In the menu bar, go to View > Plugins > Suprnova Lister. This will open up a new tab in Azureus. Click on "Update Mirror". This will get a mirror site of suprnova.org containing all current torrent files available. Once a mirror is grabbed, choose a category from the drop-down box to the left and click "Update". Wah-lah, all the available downloads appear in the main chart above. Just double click a download you want, and bang its starting to download. Open the "My Torrents" tab again to view and make sure your download started.
After your download has finished, be nice, and leave the torrent transferring. So people can get pieces of the file from you, just as you got pieces from other people.
Alternatively, if you don't want to use the plugin... you can just head to suprnova.org and download files to any folder. Then go to File > Open > .torrent File in Azureus.
This should about wrap it up for the Bit Torrent Tutorial. If you guys think of anything I should add, or whatnot, just let me know and I'll check into it.
How To Change Your Ip In Less Then 1 Minute - Software Bazar

2. Click on "Run"
3. Type in "command" and hit ok
You should now be at an MSDOS prompt screen.
4. Type "ipconfig /release" just like that, and hit "enter"
5. Type "exit" and leave the prompt
6. Right-click on "Network Places" or "My Network Places" on your desktop.
7. Click on "properties"
You should now be on a screen with something titled "Local Area Connection", or something close to that, and, if you have a network hooked up, all of your other networks.
8. Right click on "Local Area Connection" and click "properties"
9. Double-click on the "Internet Protocol (TCP/IP)" from the list under the "General" tab
10. Click on "Use the following IP address" under the "General" tab
11. Create an IP address (It doesn't matter what it is. I just type 1 and 2 until i fill the area up).
12. Press "Tab" and it should automatically fill in the "Subnet Mask" section with default numbers.
13. Hit the "Ok" button here
14. Hit the "Ok" button again
You should now be back to the "Local Area Connection" screen.
15. Right-click back on "Local Area Connection" and go to properties again.
16. Go back to the "TCP/IP" settings
17. This time, select "Obtain an IP address automatically"
18. Hit "Ok"
19. Hit "Ok" again
20. You now have a new IP address
With a little practice, you can easily get this process down to 15 seconds.
P.S:
This only changes your dynamic IP address, not your ISP/IP address. If you plan on hacking a website with this trick be extremely careful, because if they try a little, they can trace it back